Mastering UART Communication: Connecting Hubs to Modules
Embedded Systems
Universal Asynchronous Receiver-Transmitter (UART) is a cornerstone of embedded system communication. Whether you're interfacing a microcontroller with sensors, actuators, or external modules, UART offers a reliable, full-duplex communication protocol.
In this guide, we’ll explore the essentials of UART, walk you through the steps to connect a hub and peripheral modules, and share expert tips to troubleshoot and optimize your setup.
1. What is UART?
UART is an asynchronous serial communication protocol, meaning it doesn't rely on a clock signal. Its simplicity and effectiveness make it ideal for embedded applications.
Key Features of UART:
Data Transmission: Byte-by-byte, often 8 bits per frame.
No Clock Signal: Synchronization relies on matched baud rates.
Pins Used: Requires three connections:
TX (Transmit)
RX (Receive)
GND (Ground)
2. Essentials for Setting Up UART
Before you start, ensure you have the following:
Hub: Your primary device, like a Raspberry Pi, STM32, or Arduino.
Peripheral Modules: Devices to interface, such as GPS receivers, temperature sensors, or motor controllers.
Wiring and Components: Cables, connectors, and logic level converters if needed.
3. Step-by-Step Guide to Connecting Hub and Modules
Step 1: Hardware Connections
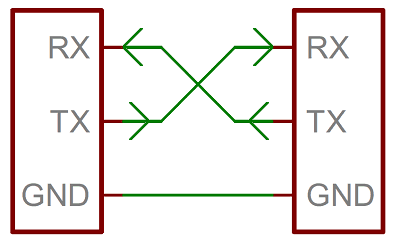
Identify Pins: Locate TX, RX, and GND pins on both the hub and module.
Wire Correctly:
Connect the TX of the hub to the RX of the module.
Connect the RX of the hub to the TX of the module.
Ensure a common ground (GND) between devices.
Check Voltage Levels:
If your hub and module use different voltages (e.g., 5V and 3.3V), use a logic level converter to prevent damage.
Step 2: Configure UART Settings
Ensure both devices are configured with the same settings:
Baud Rate: Common values include 9600 or 115200 bps.
Data Bits: Usually 8 bits.
Parity: None (unless required).
Stop Bits: Typically 1 or 2.
Step 3: Write and Test Code
Example Code for Arduino Hub:
Check the Module Documentation:
Refer to the module’s datasheet for supported commands and response formats. Some modules may require initialization commands.
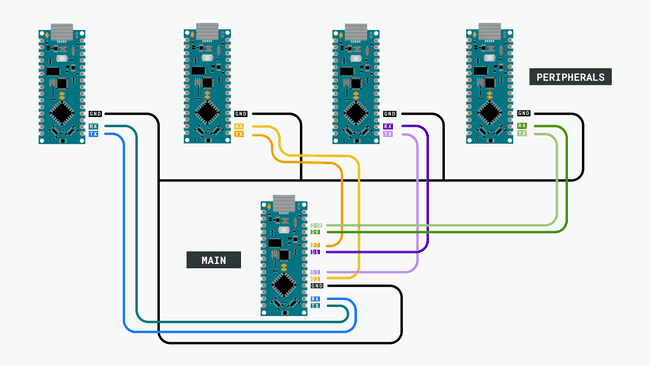
Arduino UART Connection:
Step 4: Verify Communication
Use Tools: Utilize serial monitors like Arduino Serial Monitor, PuTTY, or Tera Term.
Test Data Flow: Send and receive data to ensure everything works as expected.
4. Troubleshooting Common Issues
Incorrect Wiring
Verify TX and RX are not swapped. Use a multimeter for continuity checks.
Baud Rate Mismatch
Garbled data indicates a baud rate mismatch. Ensure both devices share the same baud rate.
Voltage Incompatibility
Protect devices using a logic level shifter when operating at different voltage levels.
No Response from Module
Check the datasheet for initialization requirements. Some modules need configuration commands to start communication.
5. Advanced Tips for UART Connections
Expand Connections: Use UART multiplexers or software emulation for hubs with limited UART ports.
Debugging Tools: An oscilloscope or logic analyzer can help observe and diagnose signal issues.
Interrupts: For real-time applications, leverage UART interrupts to enhance responsiveness and efficiency.
Conclusion
Mastering UART communication is a vital skill for embedded developers. By following proper wiring practices, aligning configurations, and leveraging debugging tools, you can build robust and efficient systems that seamlessly connect hubs with modules.
Have questions or need troubleshooting assistance? Leave a comment below, and let’s solve it together!


Am I Suitable ?
I would love to collaborate with you! Whether it is launching something new or improving what you already have, I’m here to help transform your vision into a successful reality.
Let’s make it happen!
Have a nice day!
Thanks for visiting my house!
Contact
Ritaniemenkatu, Lahti 15240, Finland
(+358) 46 583 3980